
Introduction To Sealing Wax and Wafers
In the 19th century, sealing wax was a material made by the melting of lac or rosin with turpentine and pigments. In it’s earliest forms it would have been made of beeswax and resin. The sealing wax was used to “seal” the letters or envelopes, with or without a wafer. During the early to mid 19th century the use of the wafer became popular in less formal correspondence. Often times people would imprint their sealing wax with initials, coat of arms, or other insignia as their personal mark on the sealing wax. With the onset of gummed envelopes, however, sealing wax and wafers eventually took a brief repose. By the 1870s few were using sealing wax, wafers and folded letters without envelopes. In the 1880’s sealing wax was confined to those courtly correspondences, express parcels containing valuables for security, money parcels sent by express or foreign dispatches. However, you also always had those who of the “old school” still used it in all formal letters and notes. It was seen that sealing wax in the 1880s was more commonly used in Great Britain than in America. But it began to gain acceptance and popularity again, especially in America, in the 1880s and 1890s.
How Sealing Wax Was Made
Some early common kinds of sealing wax were called Indian and Dutch, both being red. Sealing wax was made into many colors. Black sealing wax was made with the common lamp black. The golden sealing wax used powdered yellow mica or cat gold instead of vermilion like the Indian and Dutch used. The shellac and turpentine formed a brownish red transparency which allowed the mica to be seen and formed a sort of aventurine. Sometimes sealing wax was marbled by working the two, three or more colored waxes together when in a semi-fluid state. The French even went so far as to perfume the sealing wax, commonly with musk, or some other perfume.
Sealing wax came in sticks. In the early part of the 19th century they were made on a marble slab which was fixed in a frame with a chafing dish placed under the slab to keep the marble at the proper temperature. The wax was first rolled upon this warmed slab with the hands until it was reduced to a roll nearly the length of six sticks, and then brought to the exact length by being rolled with a square piece of hard wood with a handle. The sticks were then transferred onto a cold marble slab and rolled with a marble roller until quite cold. To polish the stick it was placed between two charcoal fires which were at a small distance opposite of one another. This was done until the surface was smooth and beginning to melt, constantly turning the stick. As the long sticks grow hard the length of each of the six future small sticks are deeply indented in their proper places. Then they are broken into the smaller sticks and finished them by holding the ends to the flame of a lamp and impressing on one end of the stick the manufacturer’s mark. If the sealing wax was oval shaped, channeled or ornamented then it was made by pouring the mix into steel molds.
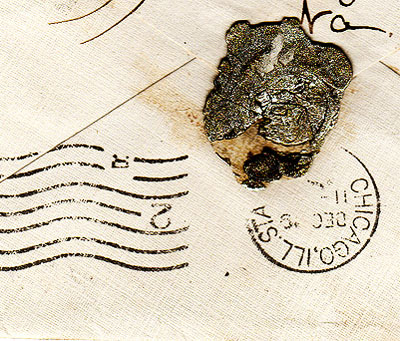
How to Apply A Seal and Sealing Wax
When sealing a letter using sealing wax, a wax taper {I believe these were made from wax and tallow} in a low stand was used. Lamps or candles were avoided since they could begin to smoke and blacken the wax. When you began to melt your wax it was suggested you rest your elbow on the table in order to keep your hand steady. You would have taken the stick of wax between your thumb and finger, held it above the light so that it barely touches the point of the flame. Turn the stick around until softened on all sides. Then you would have inserted a little of the melted wax under the turn-over part of the letter, just where the seal is to come.
This would give more stability to your seal than if it was entirely depended on the outside seal. Or you could have slipped a small wafer of white or the same color as the wax beneath the turn-over. Then begin at the outer edge of the area where the seal is supposed to go. Move the wax in a circle which must gradually diminish until it terminates at the center. Put the seal exactly to the middle of the soft wax. Press it down hard, but do not move it in a circle, then lift straight up.
How Wafers Were Made
These are sort of like a predecessor to a sticker. Wafers were made from wheat flour which was mixed with water so as to form a thin smooth paste. The paste was then pressed between two thin polished iron plates, so joined as to form, when closed, a pair of “wafer tongs”. The plates didn’t quite touch each other but are separated by a space as thick as the wafers are required. The iron plates when used are slightly warmed and greased, filled with the paste, closed and held for a few moments over a charcoal fire. The heat sets the paste and on separating the tongs a thin sheet of polished dry brittle wafer will come out. Several of these are stacked and then cut into small circular wafers by means of a punch. If made only with flour then they are white, but they are oftentimes colored by mixing lamp black, gamboge, Indigo, Vermilion, and Red Lead. Transparent wafers were made of fine glue, or isinglass. After the introduction of gumming, some fancy wafers were cut from gilt or silver paper, gummed on the lower surface and usually embossed.
How to Apply A Wafer
To use a wafer to fasten papers and letters depends on the wafer becoming soft and adhesive when it is moistened. In this state it is placed between two pieces of paper, and the latter pressed together. The wafer adheres to both pieces of paper and when it dries unites them the same way as glue would.
In Etiquette
Well etiquette, obviously, changes over the years in regards to everything. One year one thing is right to do another year it’s not. And so was the case with sealing wax etiquette. So I will give some basics of etiquette based on the decades I found information for:
1840’s
- It showed a lack of respect if you used a wafer to seal your envelope.
- Men usually used red.
- Ladies used gilt, rose, and other colors.
- When in mourning you used black seals.
- When writing to someone in mourning you used black edged paper and a black seal.
- Using red sealing wax when writing to someone in mourning was considered rudeness or ignorance.
- Large seals were considered bad taste.
- The smaller and glossier the better.
- A small letter gets one seal, a larger letter two.
- If it contains important paper or documents it should receive three or more, according to the size of envelope.
- If using a person to carry a letter as a favor, it was rude to add more than one seal.
- If your letter was folded in a manner that partly opened it at the end, its contents being able to be read, then it was impolite to put a little wax upon the edges. Only when sent by post or by domestic would this be acceptable.
- When not using an envelope and the third part of the letter is written upon you would have left a small blank space where the seal was to be put so as to not cover over any words of the letter.
- When staying overnight, and so as to not trouble your hostess, always carry a well furnished paper-case, pens, pencil, India-rubber, wafers, sealing-wax, and seals.
1850s
- Do not use motto seals unless writing to a member of your own family, or to an intimate friend.
- For common service, (and particularly for letters of business,) a plain seal, with simply your initials, is best.
- For a note always use a very small seal.
1870s
- Sealing wax went out of fashion. {However, it was still being used by some}
1880s
- Red wax seals are used in business.
- Black for mourning.
- Five tints of blue are made to express all gradations of passion.
- Pink is for congratulations.
- White for weddings and invitations.
- Square envelopes are the fashion, esp when sealed with wax.
- Either use perfumed wax or perfumed letter, but not both, that would be vulgar.
1890s
- Invitations and their replies should be sealed with wax.
- Red and black seals are proper.
- Only neat seals are considered worthy.
- Wafers were not to be used.
- Private letters should use dark green or red.
- Seal should have your monogram, and if you must your crest, but never your coat of arms.
- Men sealing their letters used seal rings or a little stamp that was obtained by a silversmith.
In France different colored waxes were used for different occasions:
- white for communication relating to weddings
- black for obituaries
- violet for sympathy
- chocolate for dinner invitations
- red for business
- ruby for engaged lovers’ letters to one another
- green for letters from lovers who live in hopes
- brown for refusals of marriage offers.
- blue denotes constancy
- yellow jealously
- pale green reproaches
- pink used by young girls
- grey used between friends
Tricky Merchants
Sealing wax made with only rosin or a portion of rosin used in place of shellac was considered an inferior quality. You could tell this by running the wax near a flame and it would run into thin drops. Other substitutes considered to be a lousy candidate was if red lead or bole was used in place of Vermilion and common Turpentine used instead of Venice. A cheap red wax would often times look purplish or brownish after it was melted. Even in the 19th century buyers had to beware, since some manufacturers were making the sticks of sealing wax appear to be of a better quality. They did this by softening the surface of the inferior wax, then rolling it in a box of powdered higher quality sealing wax, then once again softened to melt the false coat and then they gave it the last polish. So it appeared a higher quality, but it was only “skin deep”.
Economical
In the 1830s, a seemingly practical and economical solution was presented to public offices where letters sealed with wax would accumulate in great quantities. Two methods were described, and evidently were being put in practice in France, to remove the wax seals from the paper. The first was to pulverize the whole in an iron mortar, and then separate by use of sieves of the proper degree of coarseness. The second, and I think would be easier method, was to place the “mixture” in a wire basket with open meshes and expose it to steam. The wax then would melt, run through and separate from the paper. Then the wax could be collected and re-melted into sticks of sealing wax to use once again.
A Few Antiquated Recipes
Civil War Era Red Sealing Wax
4 lbs shellac
1 1/2 lb Venice Turpentine
3 lbs Cinnabar
4 oz Vermilion
Mix whole together and melt over a very slow fire. Pour it on a thick smooth glass, or any other smooth surface and make it into 3, 6 or 10 cent sticks. To stamp it, it should be re-warmed, which will give it the gloss.
Civil War Era Black Sealing Wax
3lbs Black Rosin
1/2 lb beeswax
1lb Ivory Black
1/4th lb Venice Turpentine
Melt whole together over a slow fire and pour into sticks as above.
Links
Here are a few links that sell traditional sealing wax for those who might be interested.
Nostalgic Impressions
Letter Seals